DIY Decorative Halloween Paper Craft
Tada! You can easily make this decorative Halloween Paper Craft in under and hour and rather inexpensively.
And the best part? The kids will love getting to be involved to add some Halloween festivities to the house.
Be sure to check out our spooky collection of Halloween ideas, activities and recipes for the entire family.
The other day I was at a friend’s house.
She had such a wonderful Halloween display out in her living room.
It seems she’s been collecting these Halloween house decorations for years.
And while they looked wonderful, I couldn’t help but wonder just how much money she’s spent over the years.
Then I wondered if there was a way to get my craft on while creating my own DIY Halloween Decor on the cheap.
DIY Decorative Halloween Paper Craft
What You’re Going to Need:
- Black Construction Paper
- Yellow Construction Paper
- Glue Stick
- Scissors
- Pencil
- Two toilet paper rolls or one paper towel roll
Assembly for Halloween Paper Craft:
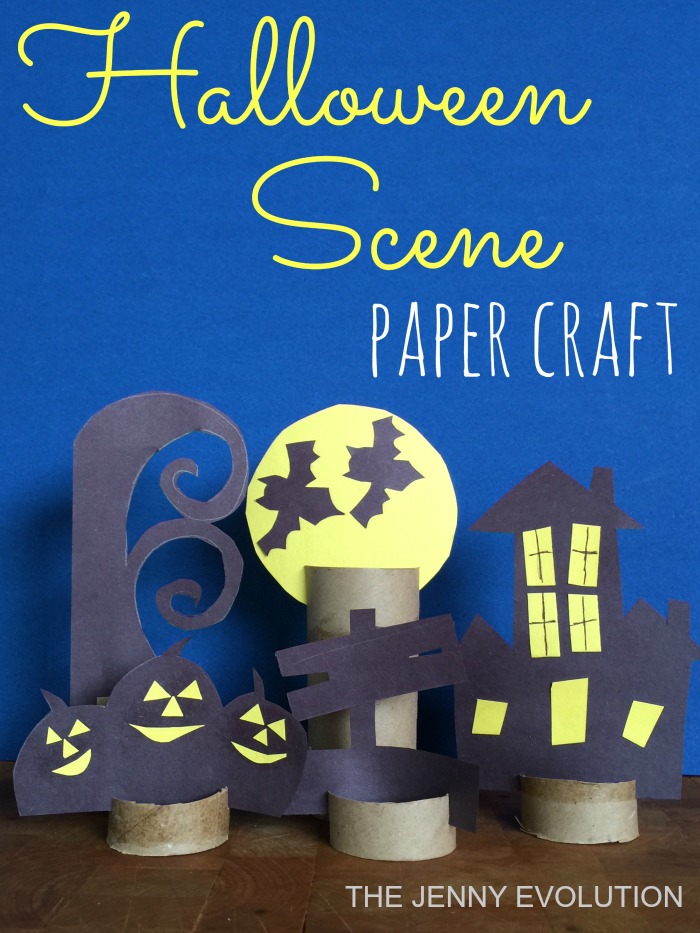
Step 1: Using the photo as a rough template take a pencil and freehand your moon on the yellow construction paper. You could also use the lip of a drinking glass for a more perfect circle, but honestly this will look even spookier if it is imperfect.
Step 2: With your moon size as a frame of reference, take your pencil and freehand your haunted house, pumpkins, bats, scary tree and wooden sign on your black construction paper. Again, this can look primitive and does not have to be perfect.
Step 3: While your little one is cutting out the shapes on the black construction paper, free hand the pumpkin eyes, noses and mouths as well as the haunted house doors and windows on the yellow construction paper.
Step 4: Use your pencil to draw the window pane sections.
Step 5: Take your glue stick and glue the haunted house windows and doors on as shown. Glue the bats onto the moon, glue the wooden sign onto its post and glue the faces on your pumpkins.
Step 6: For your moon…take one toilet paper roll and cut two slits on either side of the same end. Don’t cut the slits directly apart from each other. Try and offset the slits so that you have to slightly bend the construction paper moon to insert. This will help the moon to stand up and not droop over.
Step 7: Cut three one inch wide rings and a two inch wide ring from the other toilet paper roll.

Step 8: Cut slits in each of these additional four rings like you did for the moon. Be sure to offset the slits so your paper creations will bend ever so slightly.
Step 9: Insert your spooky tree into the two inch wide ring.
Step 10: Insert pumpkins, wooden sign and haunted house into the other rings.