DIY Frugal Easy Yarn Spring Wreath Tutorial

Here is an incredibly easy DIY Spring wreath I made in a couple of hours that cost me less than $10 in materials.
Having a beautiful Spring wreath doesn’t have to cost a lot of money.
And making one shouldn’t take up a lot of your time.
DIY Frugal Easy Yarn Spring Wreath Tutorial
My regular readers will attest to the fact that I believe in beautiful and easy projects, whether it’s for me or for the kids.
This is why I love this project so much. I have a 5yo and 7yo running around my house, so I don’t have much downtime.
In fact, while making this wreath, I was playing Minecraft, crafting with balloons with the kids and getting dinner ready.
But somehow, this wreath was completed in a day, taking up a couple of hours if I added up my time.
(Plus, I used the yarn for another decorative craft that even hubby got involved in. Read it here.)

Materials You’ll Need for DIY Yarn Wreath
The materials you’ll need:
- Yarn
- Straw Wreath
- Silk (Faux) Flowers
- Scissors
- Wire cutter
- Ribbon

I started with a basic 10″ Straw Wreath with shrink wrap. It cost me just $3.99 at the local hobby shop.
I also bought yarn that was on clearance.
I didn’t care if the yarn was soft or not considering I wasn’t going to be hugging my wreath (although I did when I finished it).
Not only was I was able to get an amazing deal on the yarn, I had a storewide coupon for 15%.
I wouldn’t have originally picked these colors but considering the deal, how could I pass them up?
In the end, I do think the colors worked out wonderfully. You be the judge.
Then I bought one stem of faux flowers at the dollar store for $1.
The ribbon I used to hang the wreath was some leftover ribbon I’ve had from wrapping presents.
It always pays to hold on to that last piece!
How to Make Your Spring Wreath
Step 1: Cut the yarn into long strips so you’re not weaving a stein of yarn around and around the wreath.
Step 2: To begin the wreath, tie the yarn around the ring of the wreath and wrap the yarn around the straw, keeping the shrink wrap on.
As you loop the yarn around the wreath, keep the yarn tight and justify the new piece next to the existing yarn.
Be sure the yarn lays next to each other not just on the flat surface of the wreath but also the curves all around (minus the back) or you will see gaps once you hang your wreath.
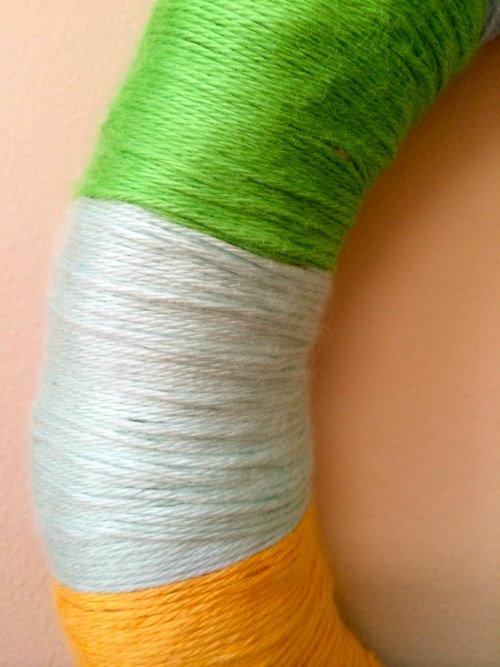
Tip: Because the outside of the wreath has more surface area than the inside, you’ll have to sometimes cover the inside yarn again and redirect the string to the outside of the wreath.
Look where the blue yarn where it meets the yellow and you’ll see how I adjusted the yarn.
Step 3: When one piece runs out, match up the end with the new string in the back and make a simple square knot.
No pinning!
No matter what type of knot you are making, make sure it’s tight.
You don’t want the knot to come undone, leaving you with a wreath that is unraveling.
Step 4: Don’t worry about making the colors equal.
It’s okay to have some patches larger than others and not match.
In the picture below, you’ll see I made the darker blue into smaller bands than the others.
It will add a bit of character to your wreath.

Step 5: To finish wrapping the wreath, just tie one final knot in the back.
Step 6: Trim away the extra strings hanging from the knots in the back.
Step 7: Grab your faux flowers and cut them from the thick part of the plastic stem using your wire cutters and leaving a couple of inches of thin stem.
Step 8: Strip away about an inch of the plastic casing from the wire.
Step 9: Using the exposed wire of the stem, pin that wire into the wreath to place and arrange your flowers.
Don’t forget the rule of threes!

Step 10: Take your ribbon and tie a very basic bow to hang the wreath from. Voila! You’re done!

I’m super thrilled about how the wreath came out, and even happier about the price tag and the time it took.
You don’t have to be Martha Stewart to create a Spring wreath you’d be pleased to hang in your home.
More Spring Wreaths
Add a fresh touch to your décor with more spring wreaths that celebrate the beauty of the season.
This is super cute, thank you for sharing with us.
I love the idea so easy!!! and mess free, I think am going to save this and use for a baby shower wreath.
Maria, it was truly mess free and easy… have fun making it into a baby shower wreath 🙂
Wow, this is so beautiful and Spring like indeed. Love the colors and Thanks for sharing this.
Love the colors you chose! Looks easy enough for kids, too, which is great!
It actually would be pretty darn easy for kids to make, Marketa.
That looks really cute and looks really simple to do. I haven’t made a wreath before.
Michelle — If you haven’t made a wreath before, then this would be the perfect intro. I don’t consider myself overly crafty and am always looking for easy projects and this one was incredible simple. Let me know if you give it a go!
Very very cute! I will definitely try this!!
Funny, I’m talking about finding a nice wreath on my blog today :oD
Let me know how your wreath turns out!
This is such an easy idea that turns out super cute! Love it.
Thanks, Jenna. It was so surprisingly easy and you just can’t beat the price tag. Let me know if you make one of your own!
What a beautiful wreath!! I love how it can be easily adapted for any season!!
It’s true… I’m sure I’ll make a new one for the 4th of July 🙂
sounds easy but time consuming haha
the end result is great though 🙂
Honestly, the whole process maybe took an hour… not really time consuming at all once I had the directions and steps I wanted to do down.
Oh my I have a TON of yarn, my garage is half full of it. I could do this, I think. It turned out really cute!
Oooo. have fun putting one together and be sure to share it 🙂
This wreath is super cute. I’ve already pinned it to my wreath board on Pinterest. Does a straw wreath work better than a styrofoam one?
A Styrofoam wreath would work just as well as long as the corners are rounded…. I just couldn’t find one!
And thanks for pinning!
I have always wanted to make one of those! I bet my daughter would love to make one as well—thanks for sharing!
I hope this inspires you to make one yourself! It really was very easy and I’m loving the end result.
Wow! Even I could do that. And it is cute! I love that you can pick any colors for any season and make a wreath. What a great idea. Thanks for sharing.
Ha! If I can do it, ANYONE can do it 🙂 Let me know if you try it out… I’m already thinking of my 4th of July wreath….
What a cute and festive way to decorate for Easter! Love this!!
Glad you like it, Marielle. Let me know if you make one yourself. Always love to see people’s projects!
that is so pretty!
Oh my my my my how BEAUTIFUL this is!
Please, would you stop by my blog hops and share it?
Tonight our Boost Your Post party starts. You can share the link to your FB post for this wreath. Then, Tuesday eve at 7pm EDT the Wonderful Wednesday Blog Hop begins. Again, I would love it if you would share this post.
LOVELY!
PINNNNNING 🙂
I just saw your note, Sinea. But I’ve earmarked your linky for next week. Thanks for the head up. 🙂
I saw this on the SITS Girls link party — thanks so much for sharing. I’m not super talented at crafts but I definitely could make this! It’s so cute.
LOL. My whole philosophy is if *I* can make it, anyone can! I don’t believe in complicated projects at all 🙂 Thanks for letting me know where you saw my spring wreath. And happy crafting!
Very cute! This would make a fun “stash buster” project, as well! 🙂
~Susie
http://www.ouicrochet.com
Oooo. Good idea 😀
That’s so pretty! I really love the color combo you chose! Thanks so much for taking the time to link up with us over at the #HomeMattersParty – we hope to see you again this Friday! Feel free to bring a friend 🙂
So colorful and pretty. I love that you could actually use up a lot of left over skeins of yarn from other projects. And it can be changed up for each season. Thank you for sharing at Share It One More Time. Cathy
You’re welcome! And yes, it’s perfect for using up left over skeins from other projects. No reason to not use what you have!
Lovely colorful wreath! Thank for joining us at #purebloglove. We enjoy having you every Thursday night at 8PM, EST through Sunday night. ~Cydnee
we are featuring this so lovely wreath in our April edition of the Free Crochet Patterns from Snickerdoodle Sunday! http://2crochethooks.com/snickerdoodle-sunday-free-patterns-april/ – I know it’s not crochet but it is yarn!
How festive! I would leave this one up all year round!
Hey Jenny, I love this pretty wreath you made. I co-host a blog party on Monday’s called Cooking and Crafting with J & J Link Up. I would love to have you come and join us. Thanks and have a great day.
Julie
This is so pretty and I really like the colors you chose! Yarn wreaths are one of my favorite type of wreaths. 🙂
This turned out so cute! 🙂
I would LOVE for you join and share this at my DIY and Recipes FB Group: https://www.facebook.com/groups/pluckyrecipescraftstips
Thanks for joining Cooking and Crafting with J & J!
Cute 🙂 Thank you for sharing with us @ #HomeMattersParty. We would love to have you again next week.
Super fun! you also brought back some memories of how we used to wrap yarn around a coffee can that was open on each end, using different colors, red & green for Christmas, pastels for Easter. Then we’d slip our cards through a loop. I haven’t thought of that for years!
I didn’t get a chance to stop by last week and tell you thanks for linking up with us at Throwback Thursday, I always read each one, but I ran out of time to comment! 🙂
Mollie
That sounds like such a fun craft to do with the kids! I hadn’t heard of this one 🙂